Welcome!
Doodling is the Thing!
by Kim
I was inspired this week to try the bleach doodling thing for wall art.
Three things inspired me.
Three things inspired me.
- This post by Alisa Burke about her gorgeous doodled canvas. I want to be Alisa Burke when I grow up.
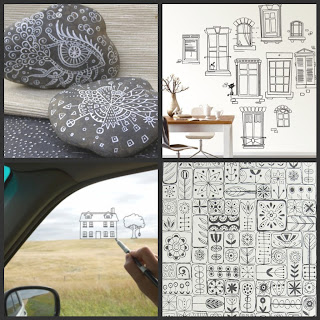
- The doodling trend. Seems like everywhere I look, someone is doing some amazing doodling. These are a few of the pins I have on my doodling board on Pinterest. I have saved the doodles I like best, but there are TONS more great ones on Pinterest. Just search doodling.
- The fun fabric bleaching project I did last week.
Not being able to ignore all that inspiration, I did this. I wrapped a canvas board in green/white dot fabric and hot glued it on the back. Then I doodled with a bleach pen. As soon as I was done doodling, I hosed it off with my kitchen sink sprayer. Now I am thinking about doing a huge one like Alisa, and adding some color back in after the bleaching.
Oh yeah, I tried bleaching a painted canvas. No go. Apparently, you can't bleach dried paint.
Take your Vitamin C!
Button Clasp Bracelet
by Kim
Buttons make great jewelry clasps. Sometimes they add just the perfect element. And, in the case of this bracelet, they can also function as the focal point of the piece. This button is from the Fabric Sensations line from Blumenthal Lansing. The whole line is gorgeous.
This bracelet is a loooooong strand that wraps around my wrist three times. To make one, put together a pile of beads that coordinate with your focal button. For this bracelet, I used:
- Fabric Sensations button
- 9mm black glass disc beads
- african silver heishi beads
- size 8 seed beads, matte black
- these awesome stones, I am not sure what they are, maybe some kind of jasper, they have sparkles, I can't believe they were in my stash instead of put to beautiful use!
- 6mm round transparent gray beads
- 6mm faceted black rondelles
- beading wire
- crimp tubes
- crimping tool and flush cutters
Make the bracelet:
1. Cut the wire long enough to go around your wrist 3 times plus 6". The larger the beads, the more wire you need.
2. Crimp one end of the wire to the button. Trim the short wire.
TIPS:
- Put a small bead between the button shank and the crimps. It will stabilize the wire so there is less bending and breaking against the edges of the metal crimp.
- Use two crimp tubes at each end for extra hold. There are a lot of beads on this long strand, it can't hurt!
3. String the beads as you wish. Mine are randomly placed.
4. Keep track of how long your strand is as you string. When you are short about 2", string on 2 crimp tubes. String enough seed beads to make a loop big enough to go around the button. Crimp and trim the wire.
Honestly, at this point, I had to string the seed beads a couple times as I adjusted the size of the loops and the length of the bracelet. It was worth it.
Wrap it around your wrist, put the button through the loop. Fab!
Take your Vitamin B(utton)!


Labels:
Blumenthal Lansing,
bracelet,
buttons,
jewelry,
jewelry design
Steering Wheel Dress Up
by Kim
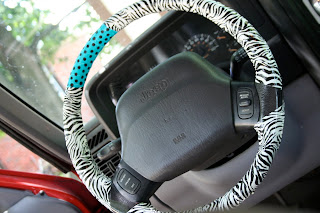
The steering wheel in Somebody's Mother's Car got a new look this afternoon.
You have a name for your car, right? It's not just me?
It has been looking like this for awhile. Poor thing is 13 years old, it needed a facelift. I was not excited about the boring steering wheel covers you find at the auto store. And, I have been mulling this over:
I don't know how durable it will be but I have more tape! And I like it! And there isn't another one like it...unless you do yours too! You know duct tape comes in all colors and patterns now. Check it out.
Take your Vitamin C before it melts!


You have a name for your car, right? It's not just me?
It has been looking like this for awhile. Poor thing is 13 years old, it needed a facelift. I was not excited about the boring steering wheel covers you find at the auto store. And, I have been mulling this over:
But, it didn't seem quite right to me and besides i did not want to spend money.
And today, two things made me take action:
- it finally bugged me just enough
- the air conditioner in my car works better than the one in the house
So I got out the cool duct tape and sat in the car with the air and the radio on. My neighbors already think I am nuts, so that didn't matter.
All I had to do was wrap it around the steering wheel. I found it was easier to tear off a section than to wrap with the entire roll attached. But, it will probably depend on how roomy your dashboard is.
Naturally it needed dots. I put them on with acrylic paint and the end of the brush handle.
I don't know how durable it will be but I have more tape! And I like it! And there isn't another one like it...unless you do yours too! You know duct tape comes in all colors and patterns now. Check it out.
Take your Vitamin C before it melts!


Labels:
car decorating,
craft,
duct tape
Bleach Doodles
by Kim
I doodled this shirt yesterday afternoon with a bleach pen.
This is the pen I used. What you see on the shirt is the amount of doodling that can be done with one pen. If you are smaller than I am, you could get the front and back of the shirt.
Here is what I learned about doodling on a shirt with a bleach pen:
- put a board inside the shirt so you have a harder drawing surface
- the bleach can be applied in a thick line (see above where I started with a thick line), or a thinner line
- If you apply the bleach and let it dry on the shirt, the bleaching will be complete and the lines will be white
- If you apply the bleach and rinse it off after 10 minutes or so, some of the shirt's color will remain
You can see that I let the application on the right dry completely before I rinsed it. On the left, I rinsed after about 10 minutes. There is a little color left. I think I like a little color left, but I could not doodle the whole shirt in 10 minutes.
Anything you can write or draw becomes he design of your shirt. The possibilities are endless!
What a great project to do with a good shirt with a stain you can't get rid of. Just draw over the stain! It is a neat and creative fix for $2.79.
Take your Vitamin C!


 Whipperberry!

Labels:
bleach,
wearable art
The Academic
by Kim
This is me right now. Sometime in the next two weeks I will finally be defending my thesis. I have dragged by feet about it, but no longer! Before the defense, I am making a 20 minute Power Point for my committee from which to work during the process. That is my task this weekend.
It's true I have learned a lot from the thesis process: about writing, researching, communicating, and about my topic. I have also learned that I really really really want this to be done.
The end is within sight. And not much Vitamin C was involved. They do not really like creativity in the thesis process. Facts rule the world of thesis writing. Cute and colorful counts for NOTHING! :)
I definitely would not mind a prayer or two in regard to this upcoming defense. Thank you!
Labels:
Kim's life
Eleven Toggle Bars
by Kim
Today, I did a project in which I used all toggle circle parts. I did not use the toggle bars. There were eleven toggle bars leftover, lying on the table looking sad. Something in me would not allow me to throw them away. And it became one of those end of the day creative challenges to figure out what to do with them.
I looked in the stash and found eleven buttons that I liked. I wired the buttons on top of the bars. Not pretty wiring, I knew it would not be seen.
I had a short section of antique gold chain and one full toggle. When I wired them together, I had a chain bracelet. To attach the button/bar pieces to the chain, I used some heavy duty jump rings. I used two jump rings per piece, to anchor them with a little more sturdiness. Is that a word?
The bars under the buttons kind of suspend them. It is a chunky bracelet, just the kind I like. The buttons are from the Amazing Helen at Blumenthal Lansing. You can find the big distressed wood button and the pretty matte finish acrylic buttons at Michaels in the needlecraft department. Look at your local fabric store for the metal buttons.
I combined buttons of wood, acrylic, and metal, and I love the finished look. Not to mention, it was a pretty quick project . Oh yeah, and I successfully used the eleven toggle bars.
Take your Vitamin C!
You never know when you will end up with eleven toggle bars....


Labels:
Blumenthal Lansing,
bracelet,
buttons,
jewelry
Subscribe to:
Comments (Atom)
Visitors
Contact Me:
kballor@aol.com


