Finally!


Dear Best Employer in the world, with the Best Job I Have Ever Had... I am ready!

Antique Jewelry

This has been unearthed from Grandma's jewelry box. I don't know a thing about antiques. But, this is what I think about these particular pieces:

  • We think these were Great Grandmother's.
  • From the tiny bit of research I did, they might be lapel pins. I think they are too short for hat pins.
  • They could be from the early 1900's... or even earlier.
  • They could be from Germany.
Let this be a lesson to you. Write notes about all of your jewelry pieces for your Great Granddaughter, so she knows what they are and how old they are. I know. None of us are going to do that, but I sure wish GG did that for me.

I love those little boots. They even have tread on the bottom.

Anyone know something about antique jewelry and have an idea what they really are?

Avoid the Crazy Crowds!

Visit Pretty Things to get info on the giveaways and how you can win them during the Virtual Craft Show.


Then come back on Saturday (the show lasts 7 days) to shop and win! There will be 70 artists displaying work. Doesn't that sound so much better than spending 20 minutes trying to find a place to park, hoofing it in, fighting the crowd, and standing in line forever to check out???


Auction News

Remember when I was working on this necklace that I donated for the school auction?

The auction was last night and word on the street is that it went for $80. That makes me happy. I could never have donated $80 to the school, so I am glad my necklace could.


Think about how your Vitamin C might help someone else today...

At the Torch


We interrupt your holiday prep thoughts for this announcement:


I am at the torch, getting ready for this virtual craft show. It starts a week from today when we are all fat and happy from turkey and mashed potatoes. A lot of beadmakers and crafters are participating. There will be giveaways!  I will remind you.


Back to pumpkin pie thoughts....


Paper Jewelry

 Yesterday's project. I wanted something bright, artsy, almost cartooney. It started with paper.


 In the 80's, I was the paper earring queen. If you knew me then, you remember. Huge earrings were the style of the decade. They were called doorknockers. For some reason, even I cannot explain, I saved my paper earrings from the 80's. I have a big box of them. I used the heaviest watercolor paper I could buy and I added all kinds of embelishments. I taught a class on making paper jewelry....many times. It was popular.


 To begin yesterday's necklace, I started with a sheet of watercolor paper. Watercolor paper comes in weights. Don't use anything under 140 lb. My preference is 300 lb, but 140 lb will work just fine. I used Liquitex acrylics. I like them because they are saturated color and there is a bit of a shine to the finish. 


 In the middle of my sheet of paper, I put out blobs of aqua, turquoise and white. I almost always add white when painting a background. I like the tinting I get with white.


 With a wide flat brush, smear it out to cover the paper. Add a little water to your brush to help it spread. Let it dry. Or use your craft dryer, aka, hairdryer.

 Add a little more texture. You can print with just about anything. This is a piece of corrugated cardboard, with the top layer removed.  Brush some paint onto the ridges and press to the paper. You can see I use this a lot, it has many colors on it. One of my most expensive tools...

 Doesn't need to be perfect. When you cut the flowers out, you will just see little bits of it.


 Freehand cut out some scrapbook paper circles with a pair of pinking shears. You can also use whatever scrapbooking scissors with fancy edges that you have on hand.  Don't bother tracing a template, just cut a circle. Mod Podge it down to the painted surface.


 Now use a smaller flat brush. Squeeze two colors on the palette. This is magenta and white. Dip one corner of the brush in  magenta and the other in white. Make a stroke from the top to the bottom in a C shape, and another the mirror image. Leave a bit of the center showing. And, I like the way you can see the paper zig zag edges if you don't use too much paint on the brush.  More texture. Let it dry.


 With a Sharpie, or your marker of choice, finish the flower. Loosely cut the flowers out.


Punch holes and string to your necklace. Add bead dangles or charms or whatever you would like to add. Make this in colors to suit you. I think it would also be really cute to hang just one as a pendant with beads hanging off the bottom. It makes a really inexpensive piece of jewelry, that is one of a kind.


Thank you for reading the latest from the Queen (retired) of paper earrings.


Use your Vitamin C!

Tutu Lamp

 You know you need a lamp with a little tutu.  


 Well, I just made one, and here is how:

 I got this roll of tulle at Michaels. You can get it at any craft or fabric store in the ribbon department or wedding aisle. Mine is brown.


Fold the width in half and stitch big running stitches next to the fold. Pull the thread to gather it. Gather as much or as little as you wish until you have a string that will go all the way around the lampshade.  


Plug in the hot glue gun and glue the gathered tulle at the bottom edge of the shade. Apply a thin line of glue. You don't need much, tulle is mostly air and you will burn your fingers if you use a lot of glue.

Take your Vitamin C!

Sumo's Sweet Stuff
Sew Can Do   Tip Junkie handmade projectsI'm topsy turvy tuesdaysCreations by KaraSomewhat Simple shabby creek cottage


Surface Design for Buttons

 I love these big 2" wood buttons from Blumenthal Lansing. And, you know me. If it is big enough to decorate, then I am doing it. These days, buttons come in all shapes, sizes, colors, and designs, so you can almost always find the perfect button for your project. But, just in case you need to personalize further, here are three ideas.


 1. Fill the center with Dimensional Magic or craft glue.


 Sprinkle seed beads into the wet glue.

 2. Choose a fabric.


 Decoupage it to cover the front of the button. After the fabric is dry, re-open the button holes with something sharp or pointy. I used a small nail to start the holes and widened them with the handle end of a small paintbrush.


3. Just paint. This is Folk Art Poppy, Yellow Lime, and Licorice.


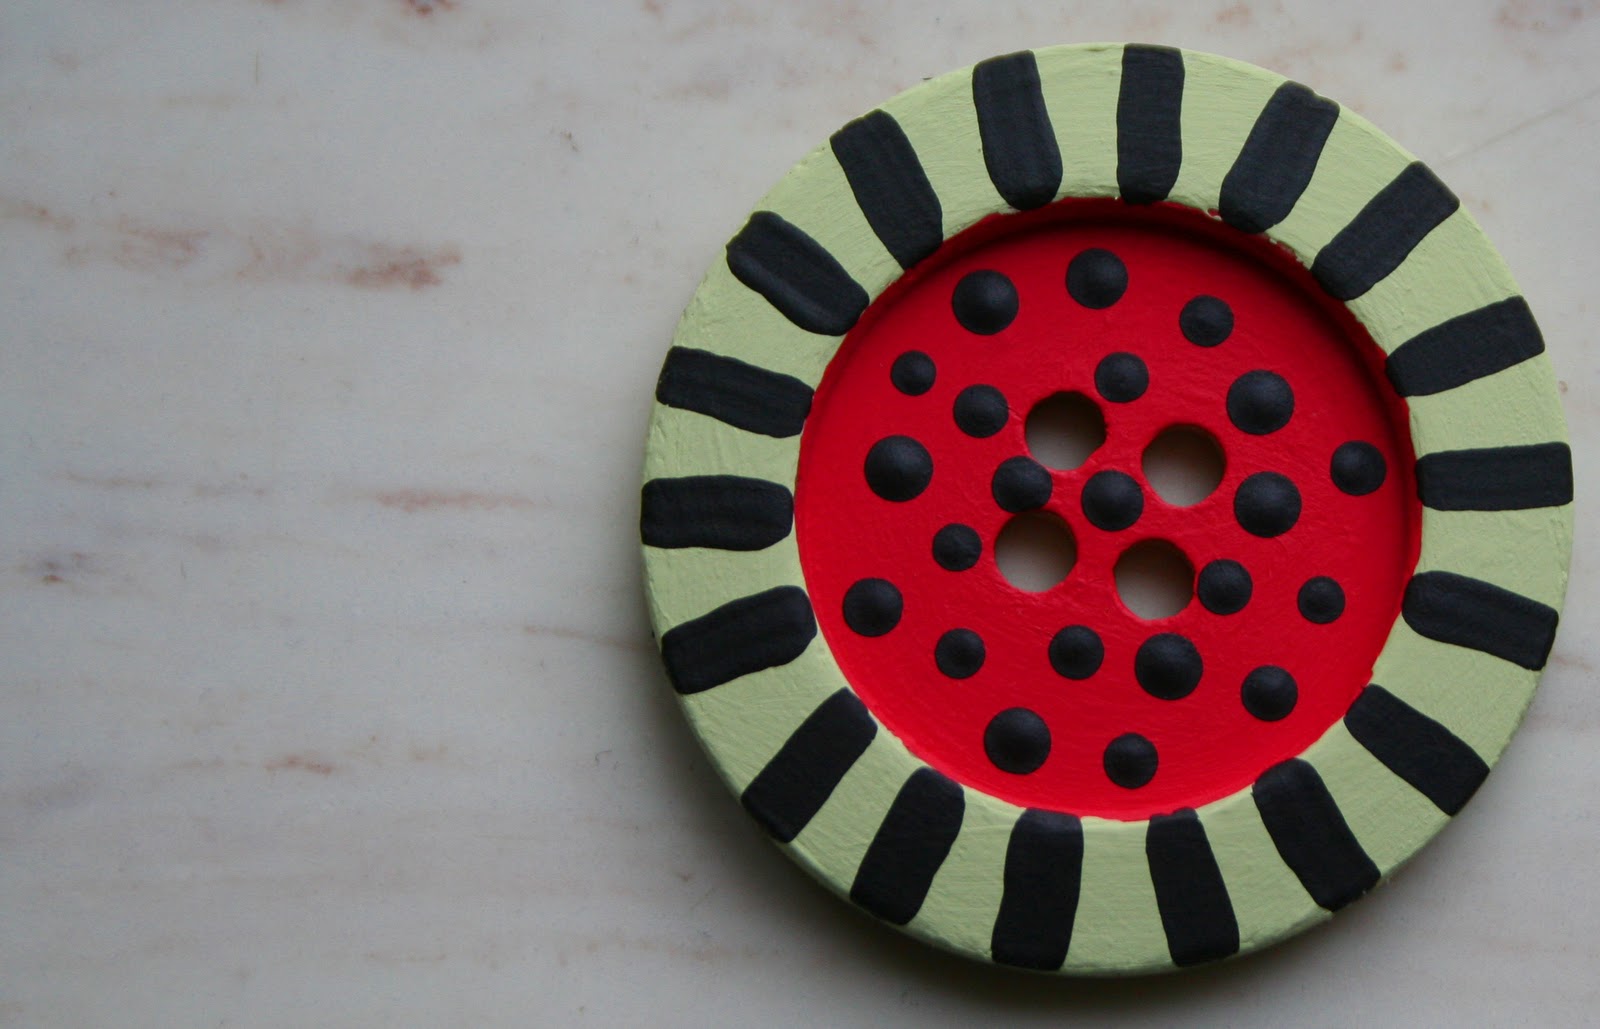
Use any of these on your craft projects. They will not wash very well, but you can use them on clothing. Stitch through the buttonholes with thread. Don't attach them to anything, just put thread in the holes. Knot it so it will stay. Then attach it to the garment with these pins. When you wash the garment, just un-pin them. Make a different set of buttons for a sweater or jacket for each holiday......


I hope this has sparked your Vitamin C and you have more ideas for designing your own buttons.


Use your Vitamin C!

Tip Junkie handmade projects

Tiny Organization

I am trying not to sweat the small stuff.

Recently, I saw this idea of storing and using your glitter in old salt and pepper shakers. And I liked it. So, I filed it away in the back of my brain.

Lo, and behold, last week, I was looking for lamps at Treasure Mart. And I found this. It cost $3. A treasure!

 I washed it and filled it with six beading items that I can never find around my house and studio. I am not as organized in my beading supplies as I could be. Part of the problem is that I work in many different areas of the house, and I pack things to take with me whenever I leave the house. So, the small bits are everywhere. It is maddening to spend more time looking for my jump rings than it takes to make the project.  


Small bits I can now locate:
1. head pins and eye pins
2. jump rings
3. ear wires
4. crimp beads (I know I have a whole bag of them someplace yet....see what I mean??)
5. silver spacer beads
6. black spacer beads


I can hardly wait to get a new project going so I can revel in my new organization!
Use your Vitamin C!

Safety Pin Bracelets with the Girls


The girls came over and made safety pin bracelets. It is so much fun to craft with them. They know exactly what they want to learn to do. We have done pop top bracelets and sewn messenger bags.

I just explain and they run with it. It took them no time at all to string 60 safety pins.

Many thanks to the Human PinBall for the beads. We appreciated them very much!


Share your Vitamin C!

Related Posts Plugin for WordPress, Blogger...

Visitors

Contact Me:

kballor@aol.com