Welcome!
Magnetic Pocket
by Kim
How great is a project that turns out this cute and didn't cost a penny? I had all of the pieces in my stash, except for the main piece that I trash picked at Wendy's. I admit it.
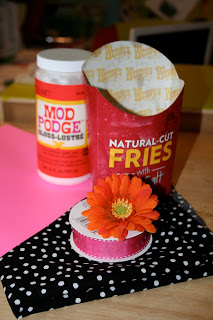
Here is what you need to make one:
Oh yeah, sea salt!
How I did it:
1. I opened the two side seams, they were just lightly glued.
2. I wanted a bright color on the inside, so I decoupaged a piece of cardstock there. My paper was not long enough, so I pieced a smaller section of paper at the bottom. No problem, it is the inside. Attach the paper with a coat of Mod Podge. Let it dry, brush on another coat. Trim around the edges. Make sure to let it dry completely before moving on.
3. I had a scrap of black and white polka dot fabric. Love it, so I decoupaged it to the outside.
TIP: Don't use light colored fabric, the color of the package will show through.
5. Fold the flaps up. Hot glue them together, re-assembling the pocket.
6. Glue ribbon around pocket. Glue flower head to right side. Glue magnets to the back of pocket.
Mine is on my black fridge. I love it there, holding some scissors and markers that I can never find.

Here is what you need to make one:
- large french fry pocket
- fabric or paper (or both) large enough to cover the pocket
- Mod Podge (I used gloss, but choose what you like)
- 1" wide grosgrain ribbon (about 9")
- a silk flower head
- 4 strong magnets
- flat paintbrush, scissors, hot glue gun and glue
Oh yeah, sea salt!
How I did it:
1. I opened the two side seams, they were just lightly glued.
2. I wanted a bright color on the inside, so I decoupaged a piece of cardstock there. My paper was not long enough, so I pieced a smaller section of paper at the bottom. No problem, it is the inside. Attach the paper with a coat of Mod Podge. Let it dry, brush on another coat. Trim around the edges. Make sure to let it dry completely before moving on.
3. I had a scrap of black and white polka dot fabric. Love it, so I decoupaged it to the outside.
TIP: Don't use light colored fabric, the color of the package will show through.
5. Fold the flaps up. Hot glue them together, re-assembling the pocket.
6. Glue ribbon around pocket. Glue flower head to right side. Glue magnets to the back of pocket.
Mine is on my black fridge. I love it there, holding some scissors and markers that I can never find.
- You could place it on your metal filing cabinet.
- You could skip the magnets and pin it to a bulletin board.
- Kids can make these and they would be a great teacher gift.
- I am going back to the craft room to make more so I can have a row across the front of the fridge.

Labels:
decoupage,
recycled craft
Subscribe to:
Post Comments (Atom)
Visitors
Contact Me:
kballor@aol.com


12 creative thoughts:
Would love if you came and shared this at my linky party this weekend!
http://itsacraftylife.blogspot.com/2011/02/saturday-swagger-link-up-3.html
I am having 2 giveaways on my blog.A chance to win $15 store credit from LiaGeneFab11 who has fancy headbands and hair clips for little girls and a fairy silhoutte tee from ElizabethHorton. Just leave a comment to win. http://houseonashwelllane.blogspot.com/2011/02/fancy-headbands-and-hair-clips-giveaway.html
Leave a Comment