Welcome!
Dorm Room Blackboard
by Kim
Remember the Blackboard of Blossoms? This is its cousin, Bloomin' Blackboard. It is getting stuck to the dorm room wall.
It is a roll or chalkboard paper. I got it at Michaels. The paint is craft acrylic.
I selected three sizes of circle patterns: a spool, and the top and bottom of a plastic cup. I traced them onto the blackboard paper with a chalk pencil and painted.
The outlining was done with white acrylic paint and a tip pen. You could also use a paint marker.
Not sure whether the girls will hang it vertically or horizontally. It could go either way. Pretty cute for $4.99 and 2 hours of designing and painting.
Use your Vitamin C!
Labels:
dorm decorating,
home dec,
painting
Restyled Lamp
by Kim
I am having the most fun in the studio right now working on requests from Niece 1 and Niece 3 for their dorm rooms! Niece 3 will have as much in her dorm room as I have in my house. When I went to college...in the stone age, I took my clothes. The end. Her room is going to be a reflection of her. Or my studio. Some handmade touches will make it feel homey.
These fancy lamps are popping up everywhere with price tags starting at $50 for small side lamps. Don't get the checkbook out yet. They are easy to make yourself, for much less money. Niece 3 now has this turquoise and black lamp in her dorm room at the University of Michigan.
I got this lamp, complete with shade and bulb at the Salvation Army Thrift Store for $9.99. And, it works. But, no plain lamps for us!
This is a good beginner project. You need the lampshade, a piece of fabric big enough to cover it, Mod Podge (I used the matte finish, but it also comes in gloss and sparkle), a paintbrush, a pair of scissors, a hot glue gun, and a craft boa. You can add acrylic paint like I did, but it is not a deal breaker. Maybe you have some pretty fabric that needs no extra decorating.
Work with the shade sitting on the lamp. Brush Mod Podge on the shade. Work a section at a time, making sure you leave no dry spots. Place the fabric over the wet Mod Podge. Smooth the fabric out with the brush until it is smooth. Keep working, adding Mod Podge and the fabric over it until the shade is covered.
Using scissors, trim the fabric around the top and bottom edges and the final fabric edge on the shade.
Then, to make the lamp easier to dust later, brush a coat of Mod Podge to cover the shade. Let it dry completely.
I added big black dots made with black acrylic paint and a large Spouncer. A Spouncer is a round sponge on a handle. Any craft store worth its salt carries them in 3 sizes. They make painting dots fast and easy.
This black feather boa was in my craft cupboard. Deep in the cupboard. SO deep, it looked like it had been dead for 10 years. It was squished and scrawny. A few minutes in the dryer fluffed it right out. I hot glued it around the base of the shade. Do you know you can buy feather boas in many colors at the craft store? They are inexpensive too.
TIP: Don't glue the boa around the top of the lamp. It gets pretty hot when the lamp is on for awhile. You don't want your lamp to be a fire hazard.
I did not have to paint the base because it was in good shape. So, for minimal work and $, Niece 3 has a one-of-a-kind lamp for her room. I hope she hates it and gives it back!
Restyle with your Vitamin C!


Labels:
dorm decorating,
home dec,
lighting,
restyle
The Juniors
by Kim
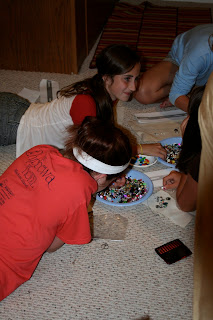
School starts Monday round these parts. The junior girls of PCA had a sleepover last night, and I was invited. I have known some of these girls since they were in elementary school and it is a treat to see the young women they are turning into. And it doesn't make me feel old at all. Not at all.
We had devotions on things out there in the world that can trip us up, and ways we can guard against that. Then, we got out the bead soup and made bracelets. It is my hope that their bracelets will be a tangible reminder of the things we talked about.
As with all groups doing bead soup, selecting beads is the most fun part of the project.
Stringing and crimping.
The final jewelry. Notice the bracelets all include heart charms?
Above all else, guard your heart,
for everything you do flows from it.
Proverbs 4:23
Guard your heart against the evils in the wolrd that take us down the wrong path. Do that by:
- Removing yourself from known temptations when possible
- Learn and keep God's word in your heart
- Don't do it alone, get someone to stand by your side and help you be accountable
- Keep a constant connection to God
Thanks girls, it was a delight to spend time with you. Thank you for sharing your Vitamin C with me!
Labels:
bead soup,
bracelet,
jewelry,
missions/ministries
The Next Gen
by Kim
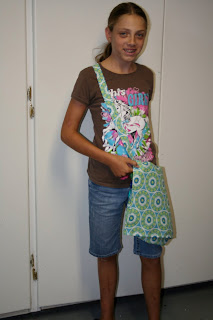
There was a very special sewing party last night in Girl World. Two of my amazing middle school girls came over to make messenger bags. I love that they are interested in learning to sew and making things themselves. They are already crafters extraordinaire. They have picked up a few sewing skills here and there and learned a little more on their own. They really did a good job on a project that I would not classify as beginner.
Right now, my Mom is laughing. I was never a patient seamstress and not known for that skill in family circles. Mom, I can do it, I just choose not to most of the time.
They learned some new things like turning a piece, topstitching, and sewing on snaps and buttons. They did every bit themselves, except when they had to stitch through 8 layers of heavy canvas and 2 needles broke. I did a tiny bit for them to finish up.
And then this happened. The electricity went out. We entertained ourselves for an hour before we gave up.
Back at it this morning!
Thanks to my girls at Blumenthal Lansing for the big buttons. They are oversized and fabulous colors and you can get them at Michaels in the notions department.
The final projects. Terrific!
Share your Vitamin C with the next generation!
Labels:
next generation,
sewing
Personal Jewelry Challenge #2
by Kim
Challenge #2, I am on a roll!
This is the piece that was the summer jewelry challenge.
All of the other bits and pieces came out of my stash, since I am not allowed to buy anything new. I really like the rhinestone piece on the button. I considered using several of them, but in the end, I thought one as the focal point had more impact. I like the way the matte finish provides a clean, subtle background for the bling. I also like the simplicity of it, since that is what drew me to the button in the first place.
Two down, three to go!
Take your Vitamin C!
Labels:
bracelet,
creative challenge,
jewelry,
wearable art
Personal Jewelry Challenge #1
by Kim
The challenge was to use only components I already own, no purchasing anything else.
It was fun to sit and watch a movie while working on my challenge!
Take your Vitamin C and challenge yourself!
Labels:
bracelet,
creative challenge,
jewelry
Dining Room Doodle
by Kim
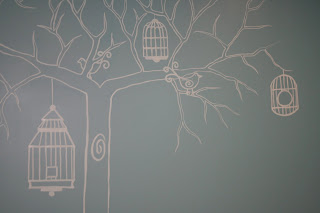
One final mission trip project in the dining room at First Step.
One small can of paint.
One brush.
Seems like everything I did today has a slight list to the right. Must be the wind blowing.
Somehow, I managed to take the worst brush I own with me. How does that always happen? It was a challenge using it, and I threw it away afterward. With relish!
Take your Vitamin C!

Labels:
doodling,
missions/ministries,
painting,
wall art
Subscribe to:
Comments (Atom)
Visitors
Contact Me:
kballor@aol.com


